How to install and configuration automation on Mac OS
Install Xcode app store of Mac OS

Install brew by Open Terminal fill in
Install Appium using Node by Open Terminal fill in
Start Appium (check if the appium service has started, check with the below command & the socket needs to be in Listening mode.) by Open Terminal fill in
Set path for Xcodebuild by Open Terminal fill in
Install tools by Open Terminal fill in Set Permission folder
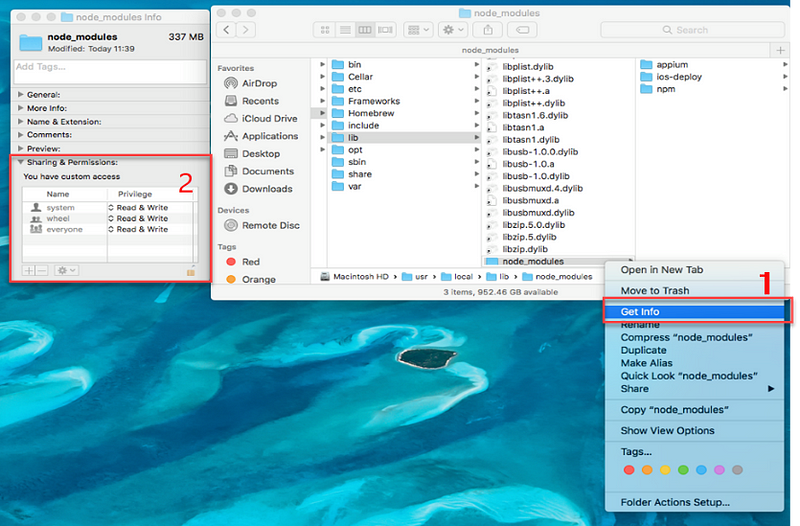
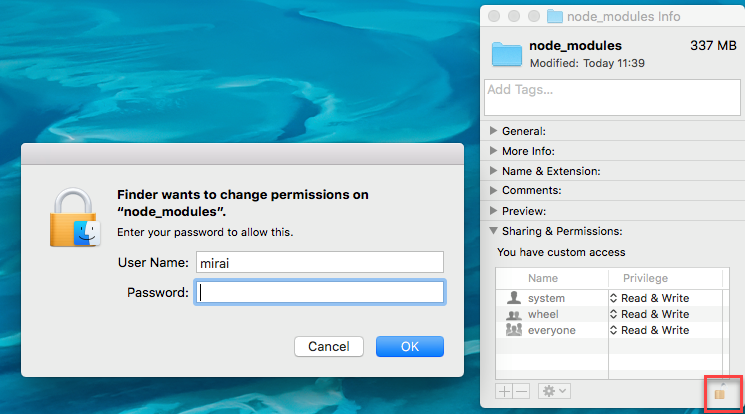
Set Sharing & Permissions You have customer account All is Read & Write and click this icon display popup message Input Password and Display info folder According to this

Check Appium for iOS by Open Terminal fill in
Configuration for iPhone Check connect iPhone of Mac OS
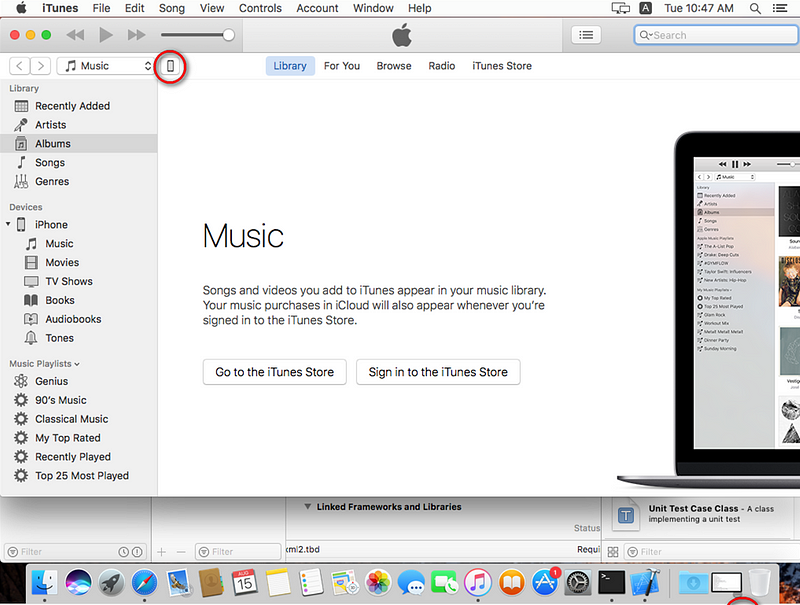
- Select application iTune and select icon mobile
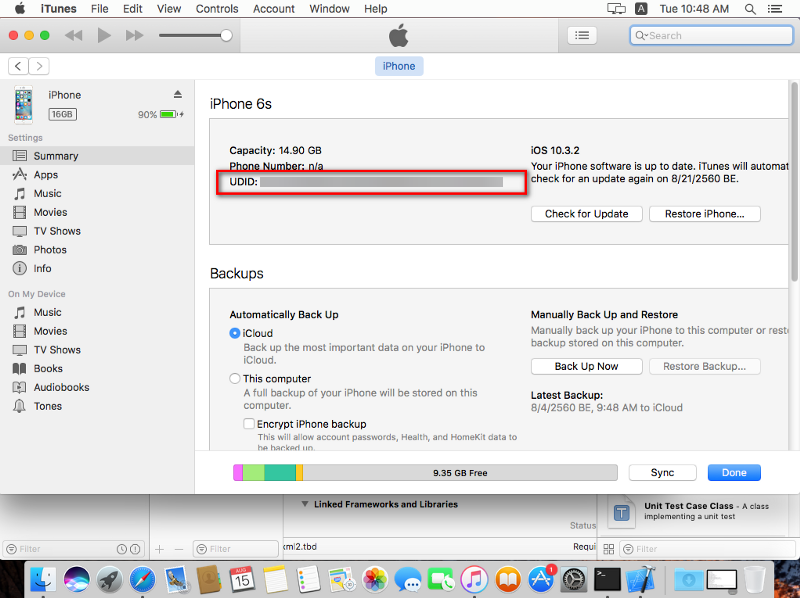
- Select Serial Number for change to UDID
Set appium by Open Terminal fill in
Set appium GUI
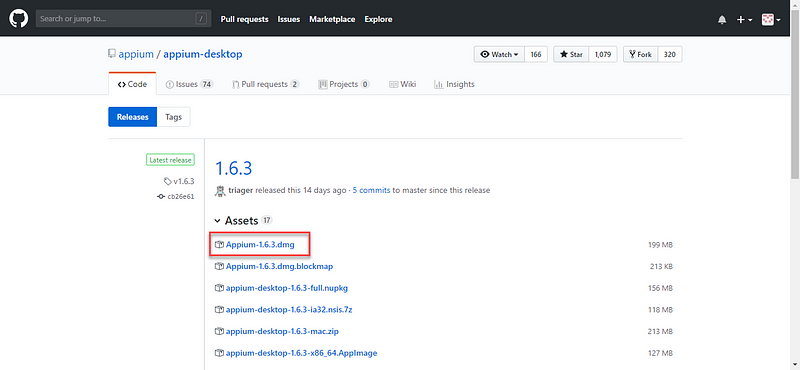
- Download Appium GUI appium
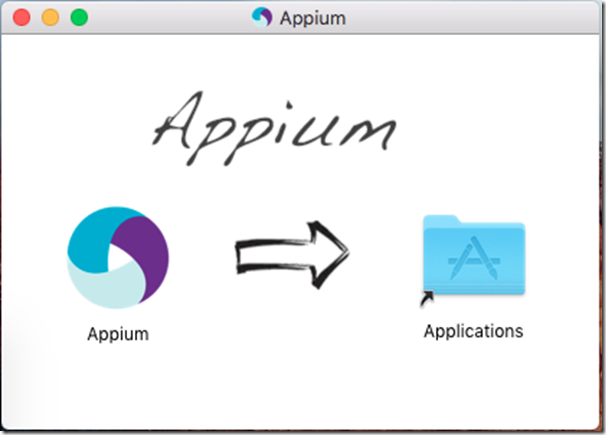
- Move Appium to Application path
Set Xcode for build iPhone (set iPhone for run automated via Appium)
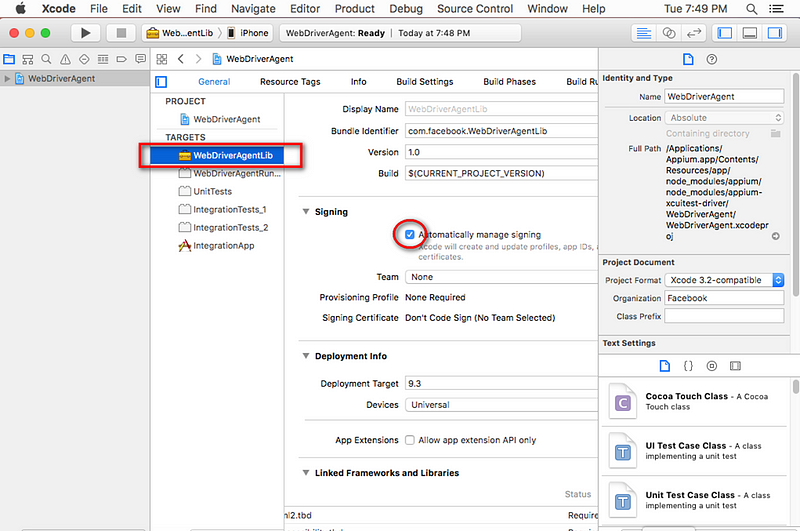
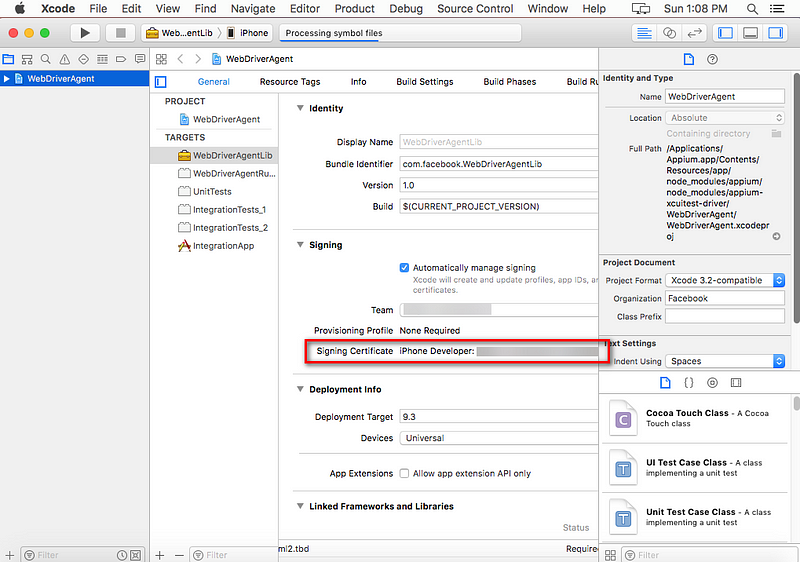
- Select WebDroverAgentLib > enable Automatically manage signing
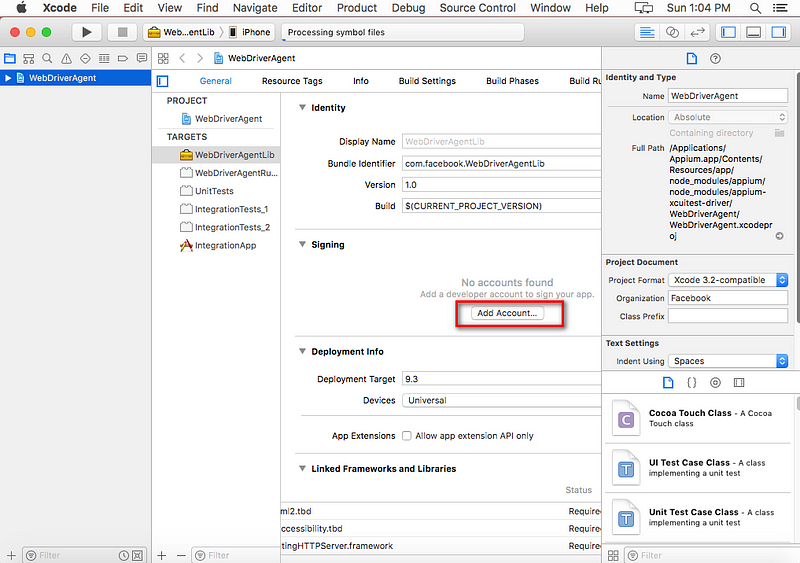
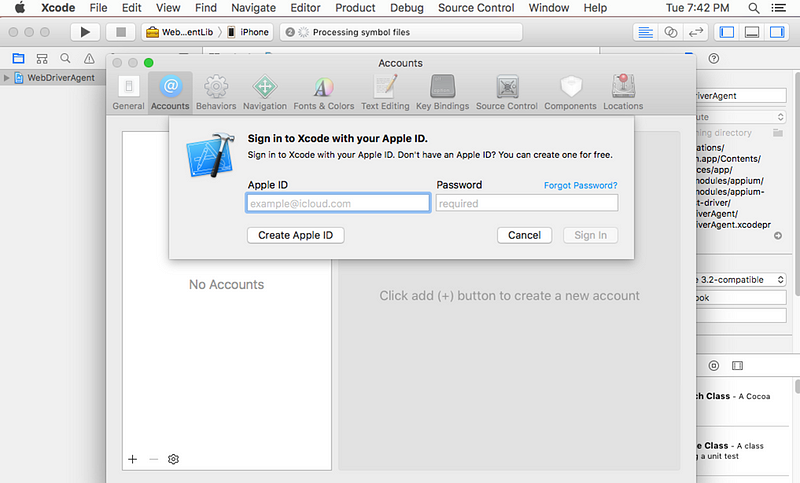
- Select Add Account…
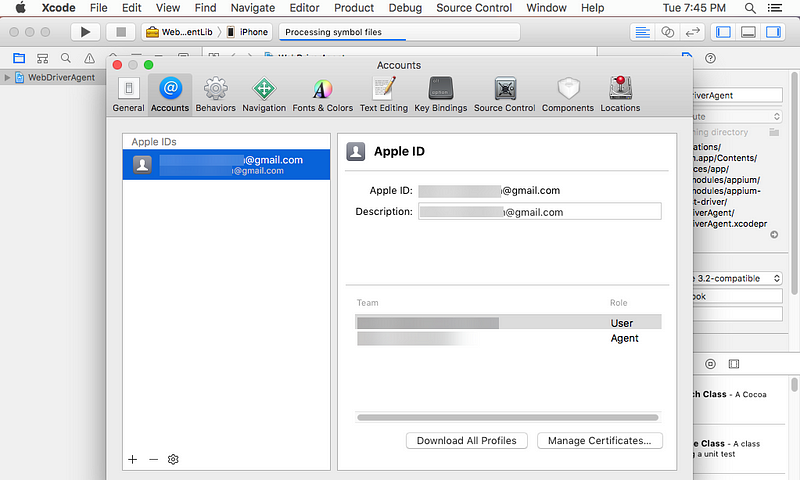
- Sign in Apple ID
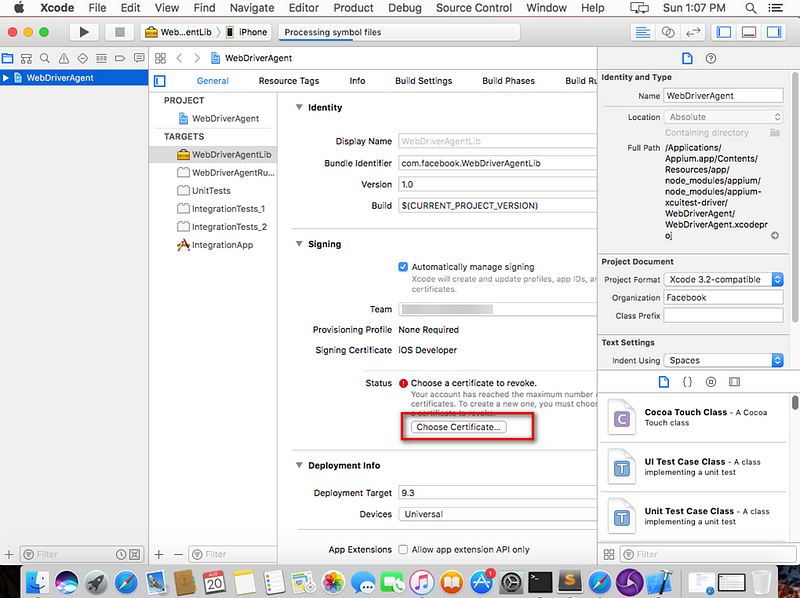
- Select Choose Certificate for Revoke certificate…
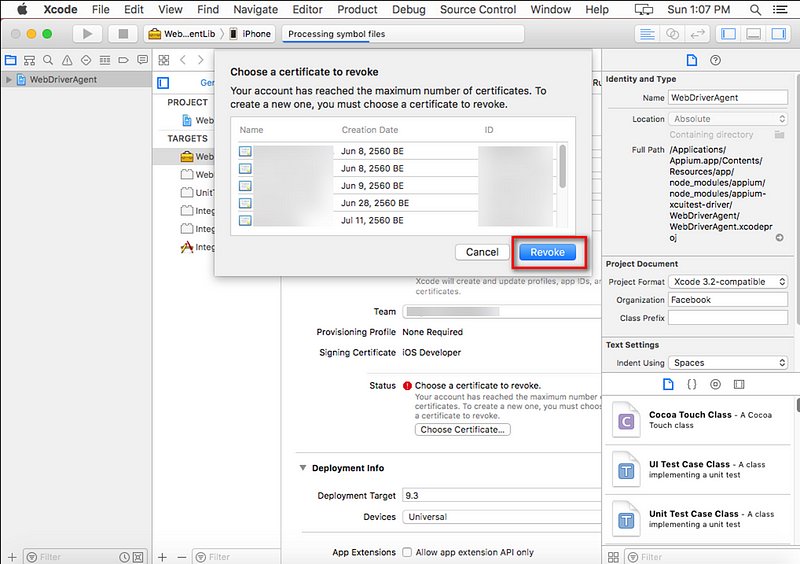
-Select Revoke
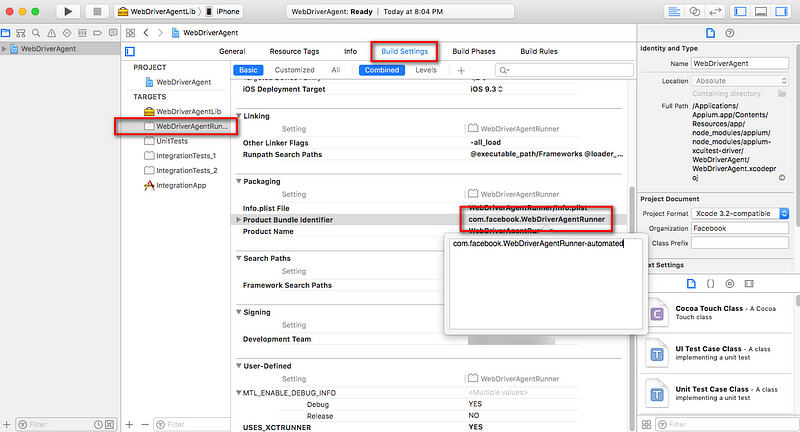
- Select WebDriverAgentRun… > Build Settings and Edit new Product Bundle Identifier (add –automated behind name)
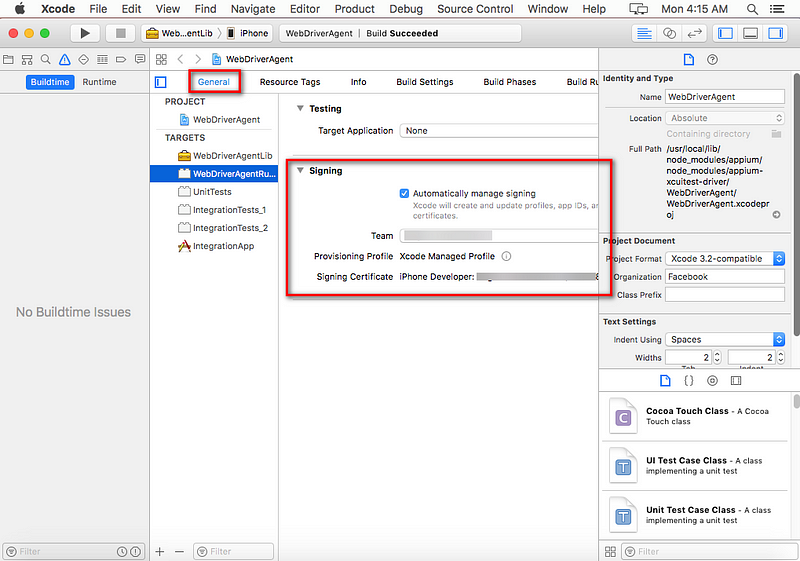
- Select WebDriverAgentRun… > General and a) Check enable Automatically manage signing and set Team already
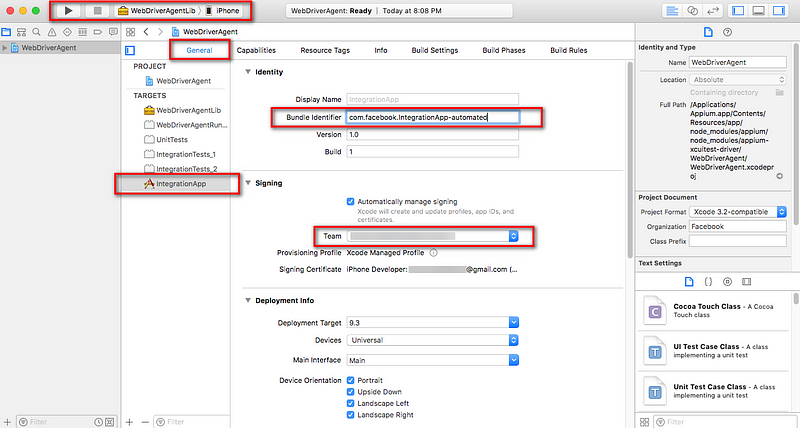
- Select IntegrationApp > General, Check Bundle Identifier (add –automated behind name) and Check enable Automatically manage signing and set Team already
Select WebDriverAgentLib > iPhone (name device) and test Build success
(Optional) Build failed or run on appium error xcode

Credit : Medium.com/@JatuphonChaisak

Install brew by Open Terminal fill in
Enter the command in the terminal.
1) ruby -e “$(curl –fsSL https://raw.githubusercontent.com/Homebrew/install/master/install)"
Install Appium using Node by Open Terminal fill in
Enter the command in the terminal.
1) brew install node
2) sudo npm install -g appium --unsafe-perm=true --allow-root
3) sudo npm install wd
Start Appium (check if the appium service has started, check with the below command & the socket needs to be in Listening mode.) by Open Terminal fill in
Enter the command in the terminal.
1) appium &
Set path for Xcodebuild by Open Terminal fill in
Enter the command in the terminal.
1) sudo xcode-select –s /Applications/Xcode.app/Contents/Developer/
Install tools by Open Terminal fill in Set Permission folder
Enter the command in the terminal.
1) cd /usr/local/lib/node_modules/
2) open .
3) Right click Folder “node_modules” to click “Get info”

Set Sharing & Permissions You have customer account All is Read & Write and click this icon display popup message Input Password and Display info folder According to this


Enter the command in the terminal.
1) brew install ideviceinstaller
2) brew install carthage or brew reinstall carthage
3) npm install -g ios-deploy
4) npm install -g deviceconsole
5) sudo gem install xcpretty
6) brew install libimobiledevice –-HEAD
Check Appium for iOS by Open Terminal fill in
Enter the command in the terminal.
1) npm install –g appium-doctor or npm install appium-doctor –g
2) appium-doctor --ios
Configuration for iPhone Check connect iPhone of Mac OS
- Select application iTune and select icon mobile

- Select Serial Number for change to UDID

Set appium by Open Terminal fill in
Enter the command in the terminal.
1) cd /usr/local/lib/node_modules/appium/node_modules/appium-xcuitest-driver/WebDriverAgent/
2) ./Scripts/bootstrap.sh -d
3) open -a Xcode WebDriverAgent.xcodeproj
Set appium GUI
- Download Appium GUI appium

- Move Appium to Application path

Set Xcode for build iPhone (set iPhone for run automated via Appium)
- Select WebDroverAgentLib > enable Automatically manage signing

- Select Add Account…

- Sign in Apple ID

- Select Choose Certificate for Revoke certificate…


-Select Revoke

- Select WebDriverAgentRun… > Build Settings and Edit new Product Bundle Identifier (add –automated behind name)


- Select WebDriverAgentRun… > General and a) Check enable Automatically manage signing and set Team already

- Select IntegrationApp > General, Check Bundle Identifier (add –automated behind name) and Check enable Automatically manage signing and set Team already

Select WebDriverAgentLib > iPhone (name device) and test Build success
(Optional) Build failed or run on appium error xcode
1) Open File WebDriverAgent.xcodeproj- Setting again and build (If it found warning, select Perform Changes and rebuild)

Credit : Medium.com/@JatuphonChaisak


Comments
Post a Comment